Appearance
Page Management
How to Add a Page
Page Content Tab
The "Page Content" tab is where you'll build out the primary content of your web pages, including text, images, and various layout elements.
Enhancing Your Content with Images
Adding images to your content can significantly improve visual appeal and break up large blocks of text.
- You can easily add images to the text area by dragging them directly from your browser into the editor. Once the image is in the box, double-click on it. In the settings, click in the height box and type
100%. Then, delete the width value and click on the lock icon to lock these dimensions. This ensures that the image will automatically adjust to fit the width of the content box, regardless of the device's screen size. - This feature allows you to incorporate more graphics than plain text, making your page more visually appealing and engaging for visitors.
Structuring Your Page with Layouts

Organising your content into sections using pre-configured layouts can improve readability and aesthetic appeal.
- You can add pre-configured sections to your page using these layout boxes. Simply click on a configuration, and it will be added to the layout at the bottom of the page. These allow you to arrange content in various column formats. To delete a section, just click the "Bin" icon located in the grey box of the section. These boxes are versatile, allowing you to add images, text, tables, and other content into each designated area.
- Utilising these layout formats helps make your page less text-heavy and more interesting for your visitors.
Responsive Content Display
Ensuring your content looks great on all devices is crucial for a positive user experience.
- The icons next to the resizing tool show you how your text will appear on core device types. Click on each icon to preview the text layout on mobile, tablets, and desktops. You can then use the
+and-buttons within the white section of each box to adjust its size. Each device format can be formatted individually. The "eye" icon allows you to remove the surrounding boxes temporarily, giving you a clearer idea of how the content will look on the live website. - This functionality ensures that your images and text are optimally displayed and visually appealing on every device.
TIP
Don't forget to submit your changes! Always ensure you save your work to apply any modifications made within these tabs.
Page Management View Icons These icons allow you to control how you view and edit your website pages within the CRM. They are essential tools for a web developer or a content manager as they allow you to switch between different editing and preview modes.
Source Code (
</>) This icon opens a code editor view, allowing you to directly edit the HTML, CSS, and JavaScript of the page. It's used for advanced changes that aren't possible with the visual editor, such as adding custom scripts, editing meta tags, or fixing complex layout issues. This is often the mode used by developers.View (👁️) This icon switches to a live preview mode of the page. It hides all the editing controls and toolbars, giving you a clean, accurate view of what the page will look like on your live website. It's perfect for a final check of the layout, colours, and text before publishing.
Desktop (💻) This icon displays the page in a desktop view, simulating how it will look on a computer screen. This is typically the default view and is useful for editing the primary layout and content of the page.
Tablet (📱) This icon shows the page in a tablet view, simulating how it will appear on a tablet device. It's a crucial tool for checking your website's responsiveness and ensuring the content is easy to read and navigate on a larger handheld screen.
Mobile (📱) This icon displays the page in a mobile view, simulating how it will look on a smartphone. Given that most web traffic now comes from mobile devices, this view is essential for checking that your website is fully responsive, easy to use, and displays correctly on the smallest screens.
Page Settings
Below each title in the interaction area, you'll find important settings that control the visibility and URL of your page.
Active
When you submit your changes with "Active" ticked, the page will immediately go live on your website. If you are preparing a page to be launched at a future date, or if you are working on a page that requires approval before going live, you can untick this box. The page will remain unpublished until it is manually ticked and saved.
Show in Main Menu
Most pages on your website are typically accessible through the main navigation menu. However, if you wish to create a page that is hidden from the website navigation, such as a special promotional page or a secret link, you can untick this box. You can then share the page link directly through marketing campaigns or email.
Slug/URI
The slug is the part of the URL that identifies a specific page (e.g., yourwebsite.com/your-page-slug). The heading name of your page automatically generates this slug. While you can change it in this box, it's generally recommended to keep the automatically generated slug. You might consider shortening it here if the page heading is excessively long or potentially confusing.
Banners Tab
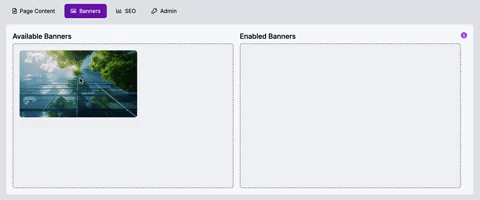
The "Banners" tab allows you to easily add visually striking banners to the top of your web pages.
- These are the banners you have previously uploaded and managed in the Media area. To add a banner to your page, simply drag the image from the left panel to the right. It will then appear at the top of your page. You can add more than one banner; they will automatically rotate through the images on the live website.
- This feature enables you to display a set of rotating images at the top of each page, providing a visually appealing introduction that reflects the page's content.
TIP
Don't forget to submit your changes! Always ensure you save your work to apply any modifications made within these tabs.
SEO Tab
The "SEO" (Search Engine Optimisation) tab provides tools and information to help improve your page's visibility in search engine results.
- SEO is the practice of optimising your web pages to help them achieve a higher ranking within search results on platforms like Google. We have a dedicated partner company that specialises in SEO services and can assist you with this. To request a consultation, simply click on the "SEO" link at the bottom of your dashboard and submit a request for a call.
- By implementing effective SEO strategies, your website can be found more easily within search engines such as Google. While SEO can significantly help, there is no guarantee that this alone will ensure top rankings. Our SEO team can provide additional marketing advice and strategies to further enhance your online presence.
TIP
Don't forget to submit your changes! Always ensure you save your work to apply any modifications made within these tabs.
Adding Sub-Pages
Sub-pages, often referred to as child pages, are web pages that are organised hierarchically beneath a main or "parent" page on your website. Think of them like folders and sub-folders on your computer; the sub-pages are contained within, and logically related to, their parent page.
Why You'd Need Sub-Pages
Sub-pages are crucial for creating a well-structured and user-friendly website. Here's why they're needed:
- Improved Navigation: They help to streamline your website's main navigation menu. Instead of having a long list of every single page, you can group related content under a broader parent page. For example, instead of separate menu items for "Our History," "Our Team," and "Mission Statement," these can all be sub-pages under an "About Us" parent. This makes it easier for visitors to find what they're looking for without feeling overwhelmed.
- Enhanced User Experience (UX): A logical hierarchy guides users through your content. If a user is interested in a particular topic, they can dive deeper into related sub-pages without having to navigate back to the main menu. This creates a smoother and more intuitive browse experience.
- Better Content Organisation: Sub-pages allow you to break down complex topics into digestible chunks. For instance, a "Services" page might have sub-pages for "Web Design," "SEO Services," and "Content Marketing," each detailing a specific service. This keeps individual pages focused and prevents them from becoming too long or cluttered.
- Search Engine Optimisation (SEO): A well-structured site with clear internal linking (from parent to sub-pages and vice-versa) can be beneficial for SEO. Search engines prefer organised websites as it helps them understand the relationship between different pieces of content, potentially leading to better indexing and ranking.
How Sub-Pages Are Nested
Nesting refers to the way sub-pages are positioned beneath a parent page in the website's structure and often reflected in the URL.
- Hierarchical Structure: In your CMS, when you add a sub-page, it's essentially linked to a parent page. This creates a clear "parent-child" relationship. A parent page can have multiple direct sub-pages, and those sub-pages can, in turn, become parents to their own sub-pages, creating multiple levels of nesting.
- URL Structure (Slugs): This hierarchy is typically reflected in the page's URL (or 'slug'). For example, if you have a parent page with the slug
/products, a sub-page named "Laptops" under it might have a slug of/products/laptops. If "Gaming Laptops" is a sub-page of "Laptops", its slug could be/products/laptops/gaming-laptops. This URL structure provides a clear path for users and search engines to understand where they are on your site. - Navigation Menus: In the CMS's 'Pages' section, you'll see the nesting visually represented, often with indentation, to clearly show which pages are children of others. This visual representation directly correlates to how your navigation menus will be built on the live website, often using dropdowns or fly-out menus to display the sub-pages when a user hovers over or clicks on a parent page in the main navigation.
How to Add Sub-Pages
To add a sub-page:
- Navigate to the 'Pages' section in your CMS.
- Locate the parent page under which you wish to create a sub-page.
- Click the '+ Add Sub' button next to the relevant parent page.
- You'll then be prompted to create your new page, which will automatically be nested under the chosen parent.
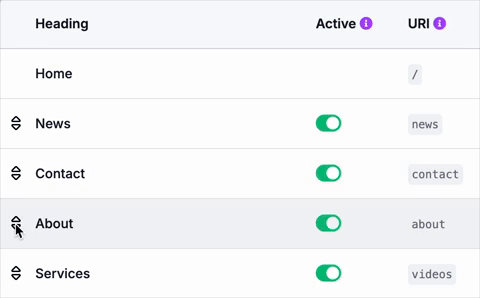
Page Order and Navigation
The navigation of a website refers to the system that allows users to move between different pages and sections of the site. It's essentially the roadmap for your visitors, helping them find the information they need quickly and efficiently. Effective navigation is crucial for a positive user experience, reducing frustration and encouraging users to explore more of your content. Common navigation elements include main menus, footers, breadcrumbs, and internal links.
The order of your pages as displayed in the 'Pages' list within the CMS directly dictates their appearance in your website's main navigation menus. Pages listed higher in the table will typically appear earlier in your menu, while those lower down will appear later. This direct correlation means that arranging your pages in the CMS effectively controls the visual flow and hierarchy your visitors experience on your live site.
If you wish to rearrange the order of your pages or sub-pages:
- Look for the up and down arrow icons ↕️ to the left of each page heading.
- Click and drag these icons to move a page up or down the list.
- Releasing the mouse button will place the page in its new position, instantly updating its order in your website's navigation.
This functionality gives you complete control over how your visitors navigate your website, allowing you to prioritise important content, create a logical flow through your services or information, and ensure the most relevant pages are easily accessible.